How To Draw A Horse
How to Draw a Horse - Simple Steps for Beginners
Have you ever looked at a beautiful horse, with its flowing mane and powerful build, and wished you could capture that grace on paper? Many people feel a pull to create art that shows these wonderful creatures. It is a really common desire to bring such an animal to life through your hand, and you might think it looks a bit too hard at first glance. But honestly, getting started with drawing a horse is much more approachable than you might guess, so you can certainly give it a try.
This guide will walk you through the process of making a picture of a horse, from the very first marks on your page to adding those special touches that make your artwork unique. We will go over simple methods that are good for people just starting out, whether you want to make a cute cartoon horse or something that looks a bit more like a real one. You will find that breaking it down into smaller, easy-to-follow steps makes a big difference, you know.
You do not need a lot of fancy art supplies to get going; a pencil and some paper are a great start. We will cover how to use basic shapes to build your horse, how to add details like the eyes and the way the hair flows, and even some tips for practicing your abilities every day. So, basically, get ready to put your creative ideas onto paper and see what you can make!
- Who Is Ashley Judd Married To
- Kristin Chenoweth Relationship
- Tim Burton Dating History
- Faye Maltese
- Who Is Larray Dating
Table of Contents
- Setting Up Your Creative Space for Drawing a Horse
- What Are the First Shapes for How to Draw a Horse?
- Adding Important Details to Your Horse Picture
- How Do You Draw the Legs and Hooves of a Horse?
- How Can You Finish Your Horse Sketch?
- Where Can You Practice More How to Draw a Horse Skills?
Setting Up Your Creative Space for Drawing a Horse
Before you even put pencil to paper, it is a good idea to get your things ready. This means gathering your art tools so you are not stopping in the middle of your work to look for something. For many of these drawing activities, all you really need is a simple pencil and some paper. Having a good eraser is also pretty helpful, especially when you are just sketching out your first lines, because you will probably want to make some changes as you go, you know.
Some people like to use a black marker, like a Sharpie, and colored pencils to give their horse pictures a finished look. If you are following along with a video lesson, having these things ready means you can pause and play as much as you need without any interruptions. This preparation helps you focus on the creative act itself, which is what we are after, basically.
You might also want to have a way to watch a video if that is how you prefer to learn, or a place to print out a guide if you like to have a paper copy. The goal here is to make your drawing time smooth and enjoyable, so you can just focus on the steps for how to draw a horse. Getting everything prepared ahead of time can make a big difference in how your drawing session feels, in a way.
What Are the First Shapes for How to Draw a Horse?
Starting a picture can sometimes feel a little bit overwhelming, but when you begin with very simple shapes, it becomes much easier. These first shapes are like the bones of your horse drawing; they give you a basic structure to build upon. They help you get the overall size and placement right before you worry about any of the smaller details. This initial step provides a solid framework for the horse's entire body, which is really important.
Starting with the Main Body Shapes for How to Draw a Horse
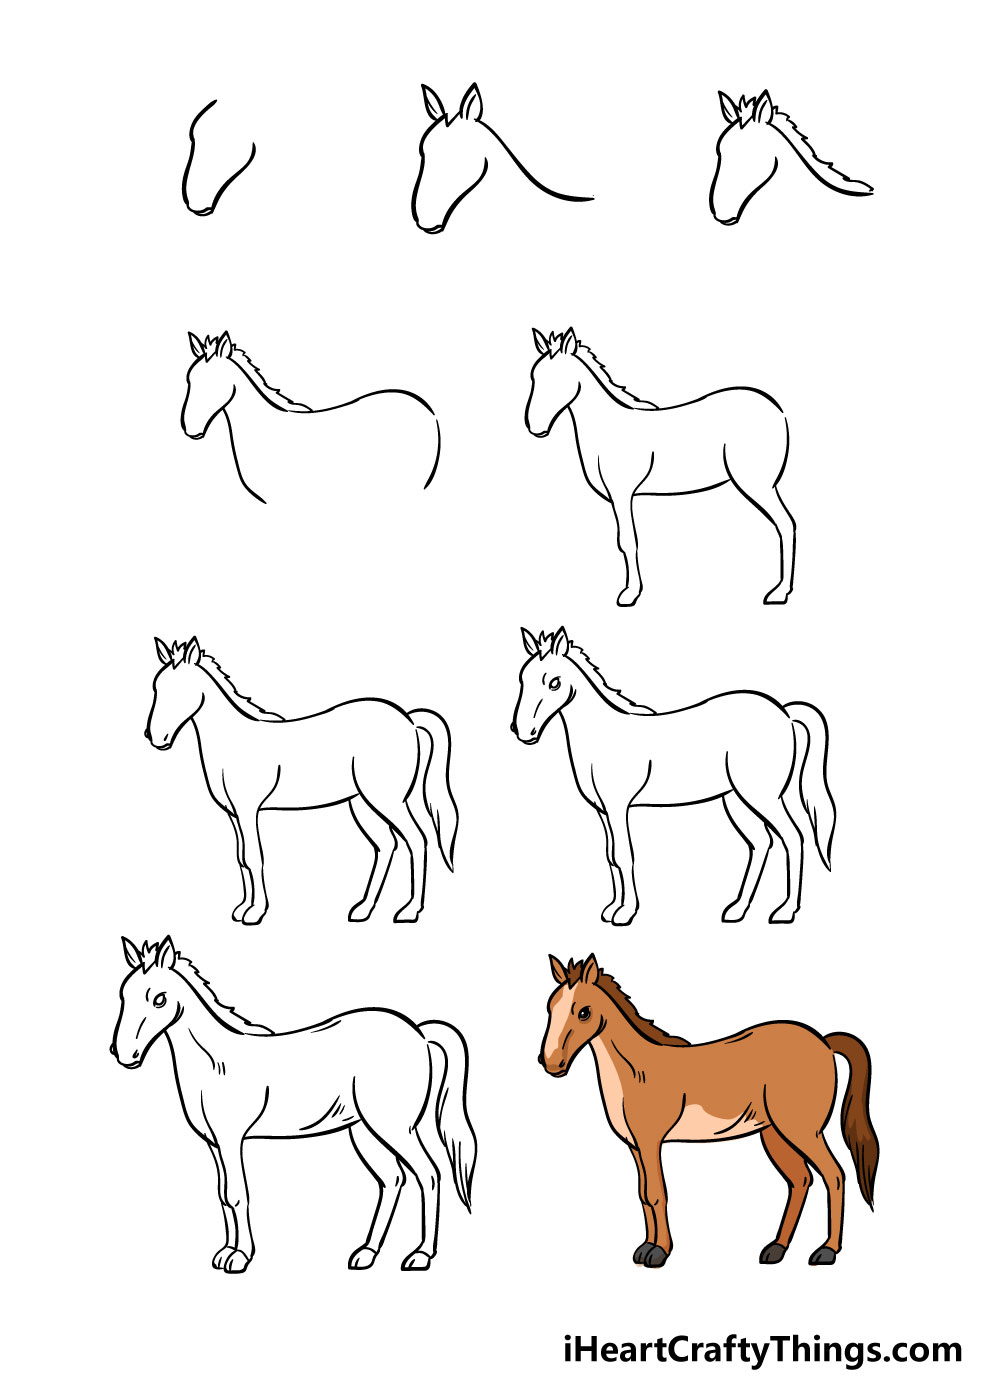
To begin making your horse picture, one helpful way to get things going is to put down a simple, rounded shape, kind of like an egg that is lying on its side. This shape, you know, will act as the main part of the horse's body, giving you a good spot to build from. Once that first rounded form is on your paper, you will want to split it right down the middle with a straight up-and-down mark. This mark, you see, helps you get a sense of the horse's middle line, making it simpler to add other parts later on.
Another common approach is to think of the horse's basic forms as a bit like a snowman, but with a much bigger bottom part. This means you might start with a smaller circular shape for the upper body or chest area, and then add a larger, more rounded shape below it for the horse's belly and back end. This method helps you set up the different sections of the horse's body, giving you a clear guide for where everything else should go. The main idea here is to create a strong starting point that will lead the placement of all the horse's features, so it is pretty important to get these first shapes down correctly, or at least lightly.
You can also begin by drawing a circular shape that is tilted a little to one side. This slight tilt can help give your horse a sense of movement or a natural pose right from the start. After you have these main body forms in place, you can then gently outline the horse's chest, its stomach area, and its back section. These initial outlines are just light guidelines, so you do not have to press too hard with your pencil, as a matter of fact.
Getting the Head and Face Right for How to Draw a Horse
Once you have the main body forms sketched out, the next step in how to draw a horse often involves working on the head and the neck. You can start by drawing the horse's head and neck using gentle, curving lines that connect to the body shape you already have. These lines should flow smoothly, trying to capture the elegant bend of a horse's neck and the general shape of its head. It is almost like you are sketching a soft, long curve that comes up from the body, you know.
For the face itself, one way to go about it is to begin by sketching the horse's face. You can then outline the nose area with a long, curving mark. This helps define the front part of the horse's face. Another method for drawing the horse's face is to start by putting down two small circular forms for where the eyes will be. After that, you can add a bigger, rounded shape for the whole head. This can be a really simple way to get the basic proportions in place, you see.
Finally, after you have the basic head and neck forms, you can begin to add smaller details to the face. These might include the eyes, the nose openings, and the mouth. These little touches are what really bring your horse's face to life, making it seem more complete and expressive. Remember, these are just guides, so you can adjust them as you go along, basically.
Adding Important Details to Your Horse Picture
After you have the foundational shapes and the general outline of your horse, it is time to start putting in the things that make a horse look like a horse. These are the specific features that give the animal its unique look and personality. Adding these elements carefully will help your picture move from a simple sketch to a more finished piece of art. It is in these details that the character of your drawn horse really starts to show through, you know.
Giving Your Horse a Mane and Tail for How to Draw a Horse
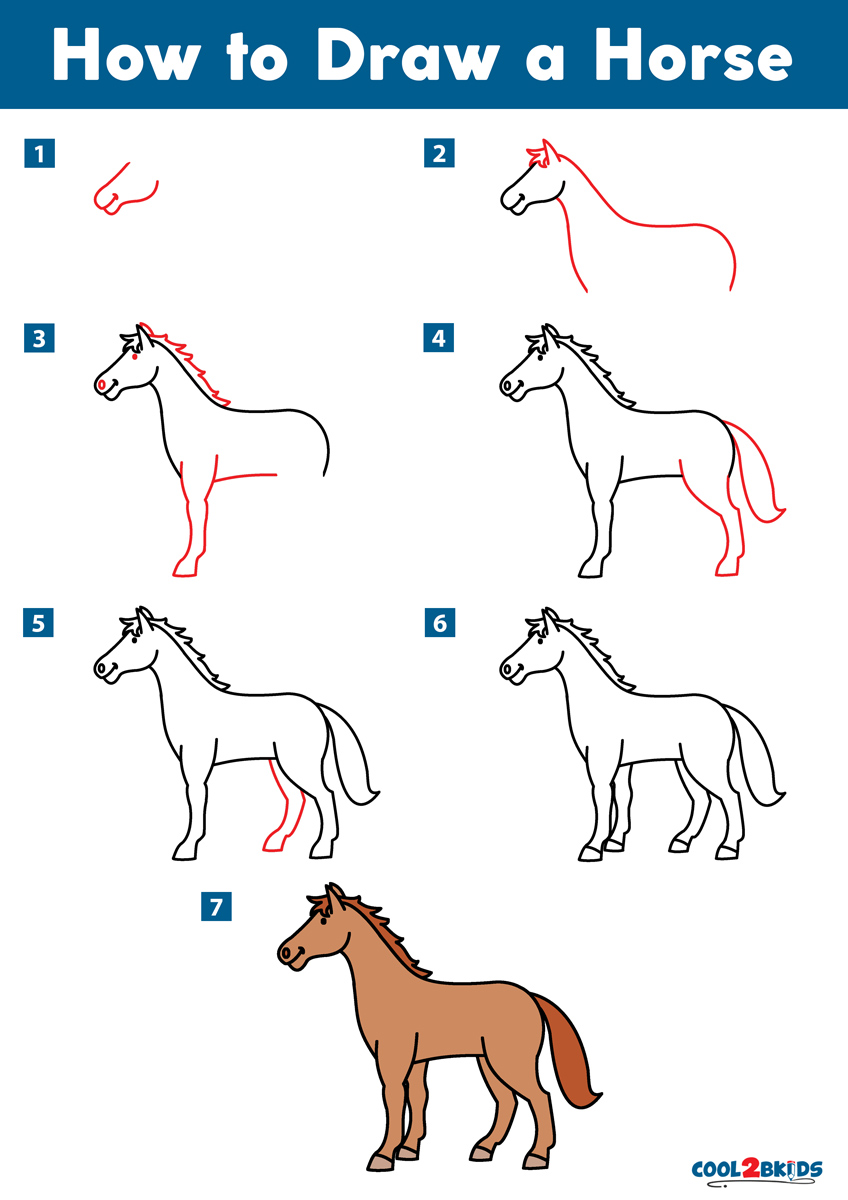
For the second main part of your horse drawing, we will be putting in the horse's mane. You can start by adding some lines that are a bit jagged or uneven between the ears. These lines will suggest the hair that grows along the horse's neck. The mane can be drawn in a way that looks like it is flowing freely, or it can be kept closer to the neck, depending on the style you are going for, you see.
When it comes to the tail, you can imagine the horse's tail is moving slightly in a soft breeze and draw it extending out from the horse's body with gentle, sweeping lines. This gives the impression of motion and lightness. On the other hand, if you want to show the horse standing still, you can keep the tail closer to the horse's body, drawing it in a more contained way. The choice of how to draw a horse's tail can really add to the feeling of your picture, so think about what kind of scene you want to show, really.
Focusing on the Horse's Eye for How to Draw a Horse
The eye is a very important part of any animal drawing, as it often gives the creature its feeling and life. For the horse's eye, a simple way to make it is to create a rounded shape with a small mark right in the middle. This central mark represents the pupil, which is the dark center of the eye. This basic form works well for many different styles of horse pictures, from simple cartoons to more lifelike representations, you know.
You can also draw an eye as an irregular round shape, meaning it is not perfectly circular, which is how real eyes often appear. Once you have this shape, you can shade a part of a circle inside it. This shading helps give the eye some depth and makes it look more realistic. Paying close attention to the eye will truly make your horse drawing more expressive and engaging, so take your time with it, basically.
How Do You Draw the Legs and Hooves of a Horse?
Once the main body and head are in place, the legs are the next big step in making your horse stand up on the paper. You will need to add both the front and back legs to your drawing. It is helpful to think about how a horse's legs bend and where the joints are, even if you are just making a cartoon version. These parts give the horse its ability to move and support its body, you know.
After you have put in the general shape of the legs, you will want to finish drawing them by adding more detail and refinement. This means making the lines smoother and more defined. You can think about the thickness of the legs and how they connect to the body. Getting the legs right is important for making your horse look stable and balanced, so take your time with these parts, really.
When it comes to the horse's hooves, you already have a basic idea of how to draw simple ones, but let us look a little closer at them this time. You can start with a mark that shows the general position of the "foot" or the lower part of the leg. It is good to keep in mind the way your own fingers bend, as a horse's leg has similar joint structures, in a way. You will then end this line with the proper length of the hoof itself.
For making the hooves look like they have depth and are not just flat shapes, you need to give them their actual three-dimensional form. This means adding lines that show the sides and the curve of the hoof, making it look solid and real. This step helps to make your horse picture more lifelike and complete, so it is worth putting some thought into it, you see.
How Can You Finish Your Horse Sketch?
After you have put down all the basic shapes and details, your initial sketch of the horse is pretty much done. This first set of lines is usually drawn very lightly, almost like a guide. Now comes the part where you make your drawing permanent and clear. This step is about turning those faint lines into a finished piece of art, which is actually quite satisfying.
If you were drawing lightly enough with your pencil, you should be able to draw the final, stronger lines right over your sketch. These new lines will be darker and more confident, making the horse's shape stand out. You can use a pencil that makes a darker mark, or even a pen or a marker, to go over your best lines. This process helps to clean up your picture and make it look polished, so it is a good idea to be careful here, you know.
If your first sketch lines were a bit too dark, or if you want a really clean final drawing, you have a couple of choices. You can either use a drawing tool that makes a thicker, darker mark to draw your final lines, making them stand out over the lighter sketch. Or, you can put a new piece of paper right over your sketch and trace the lines you want to keep. This way, you get a fresh start for your final drawing, which can be very helpful, basically.
After outlining, you can add shading or coloring to your horse drawing. This brings more depth and personality to your picture. Whether you use colored pencils, crayons, or even just different shades of gray with your pencil, adding color or shadow makes the horse appear more solid and real. This final touch truly makes your artwork pop, you see.
Where Can You Practice More How to Draw a Horse Skills?
Learning to draw anything, including a horse, gets better with regular practice. There are many ways to keep working on your abilities and get better at making pictures of these amazing animals. You do not have to draw a whole horse every single time; sometimes just focusing on one part can be really helpful, you know.
Many people find video lessons to be a great way to learn. You can follow along with a video and pause it whenever you need more time to complete a step. There are lots of these lessons available, showing you how to make a cute cartoon horse or a more lifelike one. Some videos even come from professional artists who can show you their own ways of making a horse picture in several steps, which is quite useful.
You can also look for free online lessons that break down how to draw a horse into simple steps, sometimes as few as eight. These often come with red lines that show you exactly where to draw next, making it easy to follow along. Some resources also provide coloring pages or guides you can print out, giving you a paper to work directly on or a reference to keep beside you, basically.
If you are interested in the wider world of horse art, you can explore the history of horses in art to get ideas and inspiration. There are also many other horse drawing projects and tips available that go beyond just the basic shape. For instance, some lessons are part of a series, where you learn one part of the drawing and then move on to the next. This allows you to build your abilities step by step, which is a good approach, you see.
Subscribing to channels or websites that offer drawing tutorials can keep you up to date with new lessons and ideas. The more you practice and try different approaches, the more comfortable you will become with drawing horses. Every time you pick up your pencil, you are building your skills, so just keep at it, really.
This article has covered various approaches to drawing a horse, starting with setting up your drawing space and gathering materials like pencils, erasers, and optional colored pencils. It detailed how to begin with foundational shapes for the horse's body, such as ovals and snowman-like forms, and how to establish the head and neck using curved lines. The guide also explained adding important details like the mane and tail, suggesting different ways to depict them based on movement or stillness. Special attention was given to drawing the horse's eye, describing simple circular shapes with central dots or irregular forms with shading. Furthermore, the article provided guidance on sketching the horse's legs and hooves, emphasizing the importance of joints and giving them a three-dimensional look. Finally, it discussed finishing your sketch by going over light lines with darker ones or tracing onto new paper, and adding shading or color, along with suggestions for continued practice through video lessons, online guides, and exploring the history of horse art.
- Jericho Rosales Age
- Ara Celi Actress
- Mary Peluso
- Kim Christiansen Age 9news
- Choi Woo Shik Relationships
Horse Drawing - How To Draw A Horse Step By Step!
How to Draw a Horse - Cool2bKids

Horse Easy Drawing How To Draw A Horse Easy Horse Drawing Horse
