How To French Braid Your Hair - A Simple Guide
Learning how to french braid your hair might seem a little tricky at first glance, but it is actually quite straightforward once you get the hang of it. This classic style, known for its neat, pulled-together appearance, has been a favorite for many years, offering a look that feels both put-together and easygoing. You can make this hairstyle work for almost any occasion, whether you are just heading out for a relaxed day or getting ready for something a bit more special.
Many people think of French braids as something only for formal events, yet they are very adaptable and can easily become a part of your daily style. They offer a pretty way to keep hair out of your face or to add a touch of grace to your overall look. We are going to walk through the steps, helping you see just how simple it can be to create this lovely braided design on your own hair, or perhaps on someone else's, so you too can enjoy this timeless hair choice.
This article will show you the simple actions to create a French braid, and it will also suggest some things that can help you keep the look just right. From a casual day of errands to a big celebration, this hair design is a wonderful choice that stands out. It truly is a style that has been popular for a very long time, and it seems to fit everyone, providing an elegant and simple option for any moment, like going to the gym or attending a fancy gathering.
Table of Contents
- What is the Basic Way to How to French Braid?
- How to French Braid - Picking Up New Hair Sections
- Different Ways to How to French Braid Your Hair
- How to French Braid - Finishing Touches for Your Look
- Making Your French Braid Fuller or Sleeker
- The Story Behind the How to French Braid Term
- How to French Braid - What Tools Can Help?
- Practicing How to French Braid
What is the Basic Way to How to French Braid?
To begin your French braid, you start with a small section of hair near the top of your head. This small piece, you know, will be the foundation for your whole braid. You want to gather a bit from the right side, a bit from the left side, and a bit from the very top, making sure it feels somewhat even. Once you have this initial section, you will then separate it into three equal parts. This is where the actual braiding starts, very much like a regular braid, just at the top of your head.
The first step involves making one row of a traditional braid. You take the strand of hair from the right side and cross it over the middle piece, so it now sits in the center. Then, you take the strand from the left side and cross it over what is now the new middle piece. This creates your very first link in the chain, you could say. It is a simple beginning, but it sets up the whole pattern for the rest of the style. This initial cross-over is what gives your French braid that distinct, woven appearance that everyone loves, and it's almost the most important part to get right.
Unlike a Dutch braid, where the strands go under each other, with a French braid, the middle section goes under the right and left sections as you work. This difference is what creates the look where the braid seems to sit on top of your hair, rather than being tucked underneath. It might sound like a small detail, but it really changes the way the final style appears, giving it that classic, elegant feel that has made it a favorite for many years. So, getting this part of how to french braid right is quite key.
- Alex Guarnaschelli Boyfriend
- Daniel Travanti Wife
- Erica Herman Age
- Nicole Lampson
- Who Is Jennifer Garner Dating
How to French Braid - Picking Up New Hair Sections
As you get ready to do your next cross-over in the braid, you will do something a little different from a regular plait. This is where the French braid really comes to life, you see. Before you cross the next strand into the middle, you need to pick up a small amount of new hair. This new hair comes from the loose hair next to the section you are about to move. You want to grab a piece that is roughly the same thickness as the strand you are holding, so it blends in nicely.
You then bring this fresh piece of hair together with the strand you are about to cross over. For instance, if you are about to move the right strand into the center, you would gather a small piece of hair from the loose hair on the right side of your head and add it to that right strand. Then, you cross this combined, slightly thicker strand into the center. You repeat this on the other side, picking up a small section of new hair from the left and adding it to the left strand before crossing it over the middle piece. This process, you know, is what builds the braid down your head, making it look like it is growing out of your hair.
This action of adding hair to each section as you braid is what makes French braids different from plain plaits. It creates a flowing look that starts from the top of your head and moves downwards, almost like a beautiful cascade. It is this constant addition of hair that gives the French braid its characteristic woven appearance, which is quite different from a simpler three-strand braid that just continues with the same three pieces. This is how to french braid truly takes shape, making it a bit more special.
Different Ways to How to French Braid Your Hair
Once you understand the basic idea of how to french braid, you can start to play with different versions of the style. One very popular way to French braid on yourself is to create a front French braid. This is a neat trick for keeping your hair out of your face, or perhaps for tucking away bangs if you want them out of the way for a bit. It gives a clean look that is practical for everyday wear but still has a nice touch of style, you know.
After you have made a front French braid, you have several choices for how to finish it. You could simply pin it under the rest of your hair, keeping it hidden and neat. Or, if you prefer, you could bring it up to join a high ponytail, which creates a more playful and energetic look. Another lovely option, as seen in some styles, is to pin it right next to a low bun. This creates a very soft and elegant feel, perfect for a slightly more dressed-up occasion, so it's quite versatile.
There is also the double French braid ponytail, a style that hairstylist Reem Niameh uses. This look is great for both everyday activities and more formal gatherings, showing just how adaptable French braids can be. Her little secret to getting this particular look involves a couple of straightforward steps, one of which includes using a crimper before you start braiding. This can give the hair a bit more grip and texture, making the braids appear fuller and easier to work with, which is a neat trick, really.
How to French Braid - Finishing Touches for Your Look
When you have braided all the way down to the ends of your hair, the next important step is to secure your work. You will want to use a hair band to hold the end of the braid firmly in place. Wrapping the band tightly around the hair ensures that your braid stays neat and does not come undone throughout the day. This simple step is what keeps all your hard work looking good, so it's pretty important, you know.
After you have secured the braid, you can do a little something to make it appear even better. If you want your braid to look like it has more hair, or just a bit more presence, you can gently pull out the hair strands. This means carefully tugging on the loops of the braid, making them a little looser and wider. This simple action adds volume, giving your braid a softer, more substantial appearance. It is a quick way to change the feel of the braid from very tight to something with a bit more flow, so it's a nice option.
For those times when you want a very smooth look that will stay put for hours, adding a light misting of hairspray is a good idea. Just a little bit of spray helps to keep any stray hairs in place and gives the braid a polished finish. This is especially useful if you are wearing your French braid for a special event where you need your hair to look perfect for a long time. It helps to keep everything neat and tidy, really, ensuring your style lasts.
Making Your French Braid Fuller or Sleeker
A classic French braid can sometimes bring to mind a very neat and proper style, almost like what a dancer might wear. If you are looking to change things up and get a more relaxed, free-spirited feel, there is a simple trick you can use. Just reach for a texture spray, like Cake Beauty's The Wave Maker texturing beach spray. This kind of product can add a bit of grit and hold to your hair, making it easier to pull out those strands for a fuller look, and it just gives it a different vibe, you know.
Using a texture spray before or after braiding can help you achieve that desirable bohemian look. It helps the hair to hold its shape when you gently pull at the loops of the braid, allowing you to create that wider, more voluminous appearance without the braid falling apart. This contrast shows how adaptable the French braid truly is; it can go from a very formal style to something much more casual and undone, all with a few simple adjustments and the right product, which is pretty cool.
On the other hand, if a sleek, polished look is what you are after, starting with very smooth hair is key. You might want to use a smoothing serum or a light oil before you begin braiding to reduce any frizz and create a very clean foundation. Then, when you secure the braid, make sure it is quite snug. A final touch of hairspray, as mentioned earlier, will lock everything in place, giving you that neat, unmoving style that looks quite refined, so it's really about the finish you want.
The Story Behind the How to French Braid Term
The name "French braid" itself first appeared in print in 1871. It was used in a short story called "Our New Congressman," written by March Westland. This means the style, or at least the term for it, has been around for a good long while, more than a century and a half, which is quite interesting, you know. It shows how some things in fashion and beauty can really stand the test of time, remaining popular for generations.
It is important to remember that a French braid is different from a plain plait because you keep adding hair to each section as you go. This creates that distinct cascading appearance that starts at the top of the head and flows down, looking like a continuous piece of art. This is the main characteristic that sets it apart from simpler three-strand braids where you just work with the same three sections from start to finish, so it's a bit more involved.
The way a French braid looks is also different from a Dutch braid, even though they can seem similar at first glance. When you make a Dutch braid, the strands are woven over each other, creating a braid that sits underneath the main body of hair, making it pop out more. But with a French braid, the middle section goes under the right and left sections. This weaving method is what gives the French braid its characteristic smooth, almost flat, woven look that lies closer to the scalp, which is a subtle but important difference, really.
How to French Braid - What Tools Can Help?
When you are learning how to french braid, having a few simple tools can make the process much easier. A good comb for sectioning your hair is a must. It helps you get clean, even parts, which makes the braid look much tidier. You will also need hair bands, of course, to secure the end of your braid. Clear elastic bands are often a good choice because they blend in with your hair, so they are not very noticeable.
For those who are just starting out and want to practice, a mannequin head can be a really helpful thing to have. You can find affordable ones that allow you to practice the motions without getting tired arms or struggling to see the back of your head. This kind of practice can build your confidence and muscle memory, making it much easier when you try to braid your own hair or someone else's. It gives you a chance to try things out without any pressure, which is pretty neat.
Depending on the look you are going for, other products can be useful. If you want to add volume, a texture spray, as we talked about, can do wonders. For a very sleek style, a light hairspray or a smoothing serum can help keep everything in place and looking polished. These tools and products are not strictly necessary to make a French braid, but they can certainly help you achieve the exact look you are hoping for and make the whole experience a bit smoother, you know.
Practicing How to French Braid
Many people wonder how to even begin the process of French braiding, and it can seem a bit complicated at first glance. While French braiding hair does take some practice, once you get the initial pattern going, it is fairly easy to keep it going. The key is to be patient with yourself and to keep trying. Every time you practice, you will get a little better, and your fingers will start to remember the movements, so it's a skill that builds over time.
Don't be discouraged if your first few attempts do not look perfect. That is completely normal. The more you practice sectioning your hair and adding those small pieces as you braid, the more natural it will feel. You might find it helpful to practice in front of a mirror, or even with two mirrors, so you can see what you are doing from different angles. This visual feedback can really help you understand where your hands need to go, which is quite useful.
Remember, French braids are easy once you know how, and they are always seen as quite a classy and cute style. Even though it seems complicated, it is pretty simple once you get the steps down. This skill is something you can use for many different occasions, whether it is for weekend shopping, a wedding, or a night out on the town. It truly is an amazing hairstyle that has stood out for decades, offering an elegant, effortless choice perfect for any moment, you know, which is pretty great.
This article has covered the basic steps of creating a French braid, from starting with your initial hair section and adding new pieces, to different variations like the front French braid and double French braid ponytail. We also discussed how to secure your braid, make it look fuller or sleeker with simple techniques, and touched upon the history of the term. Finally, we looked at helpful tools and the importance of practice to master this classic and versatile hairstyle.
- Adam Brody Date
- Erica Herman Age
- Daisy Edgar Jones Boyfriend
- Louise Ford
- Mar%C3%ADa Fern%C3%A1ndez Ache
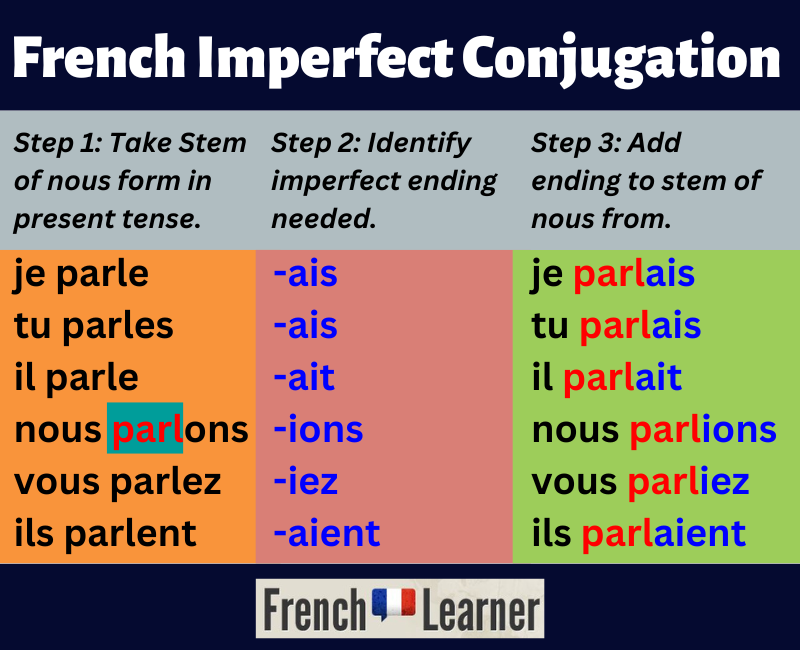
french-imperfect-conjugation | FrenchLearner.com
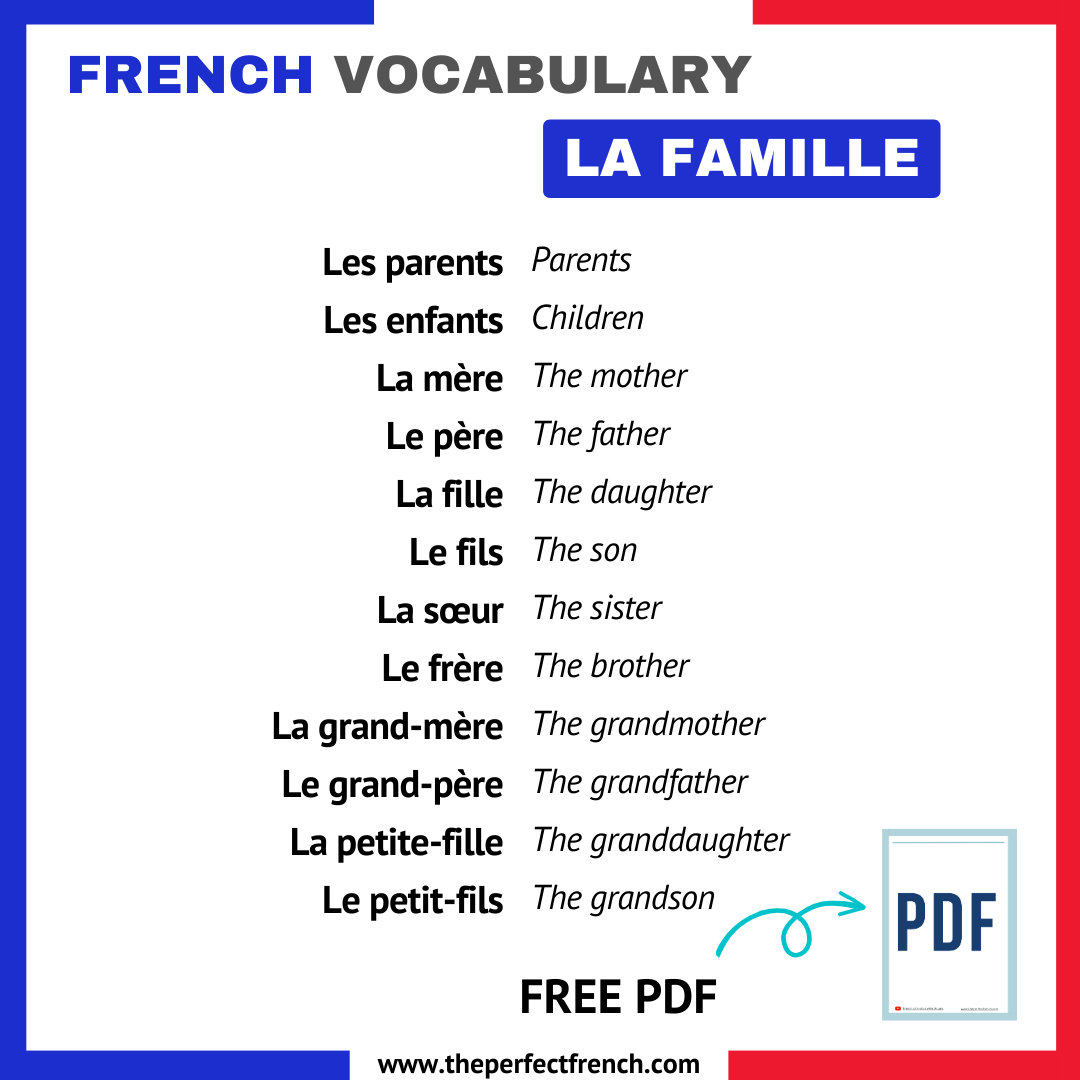
French Vocabulary: Family - French Online Language Courses | The
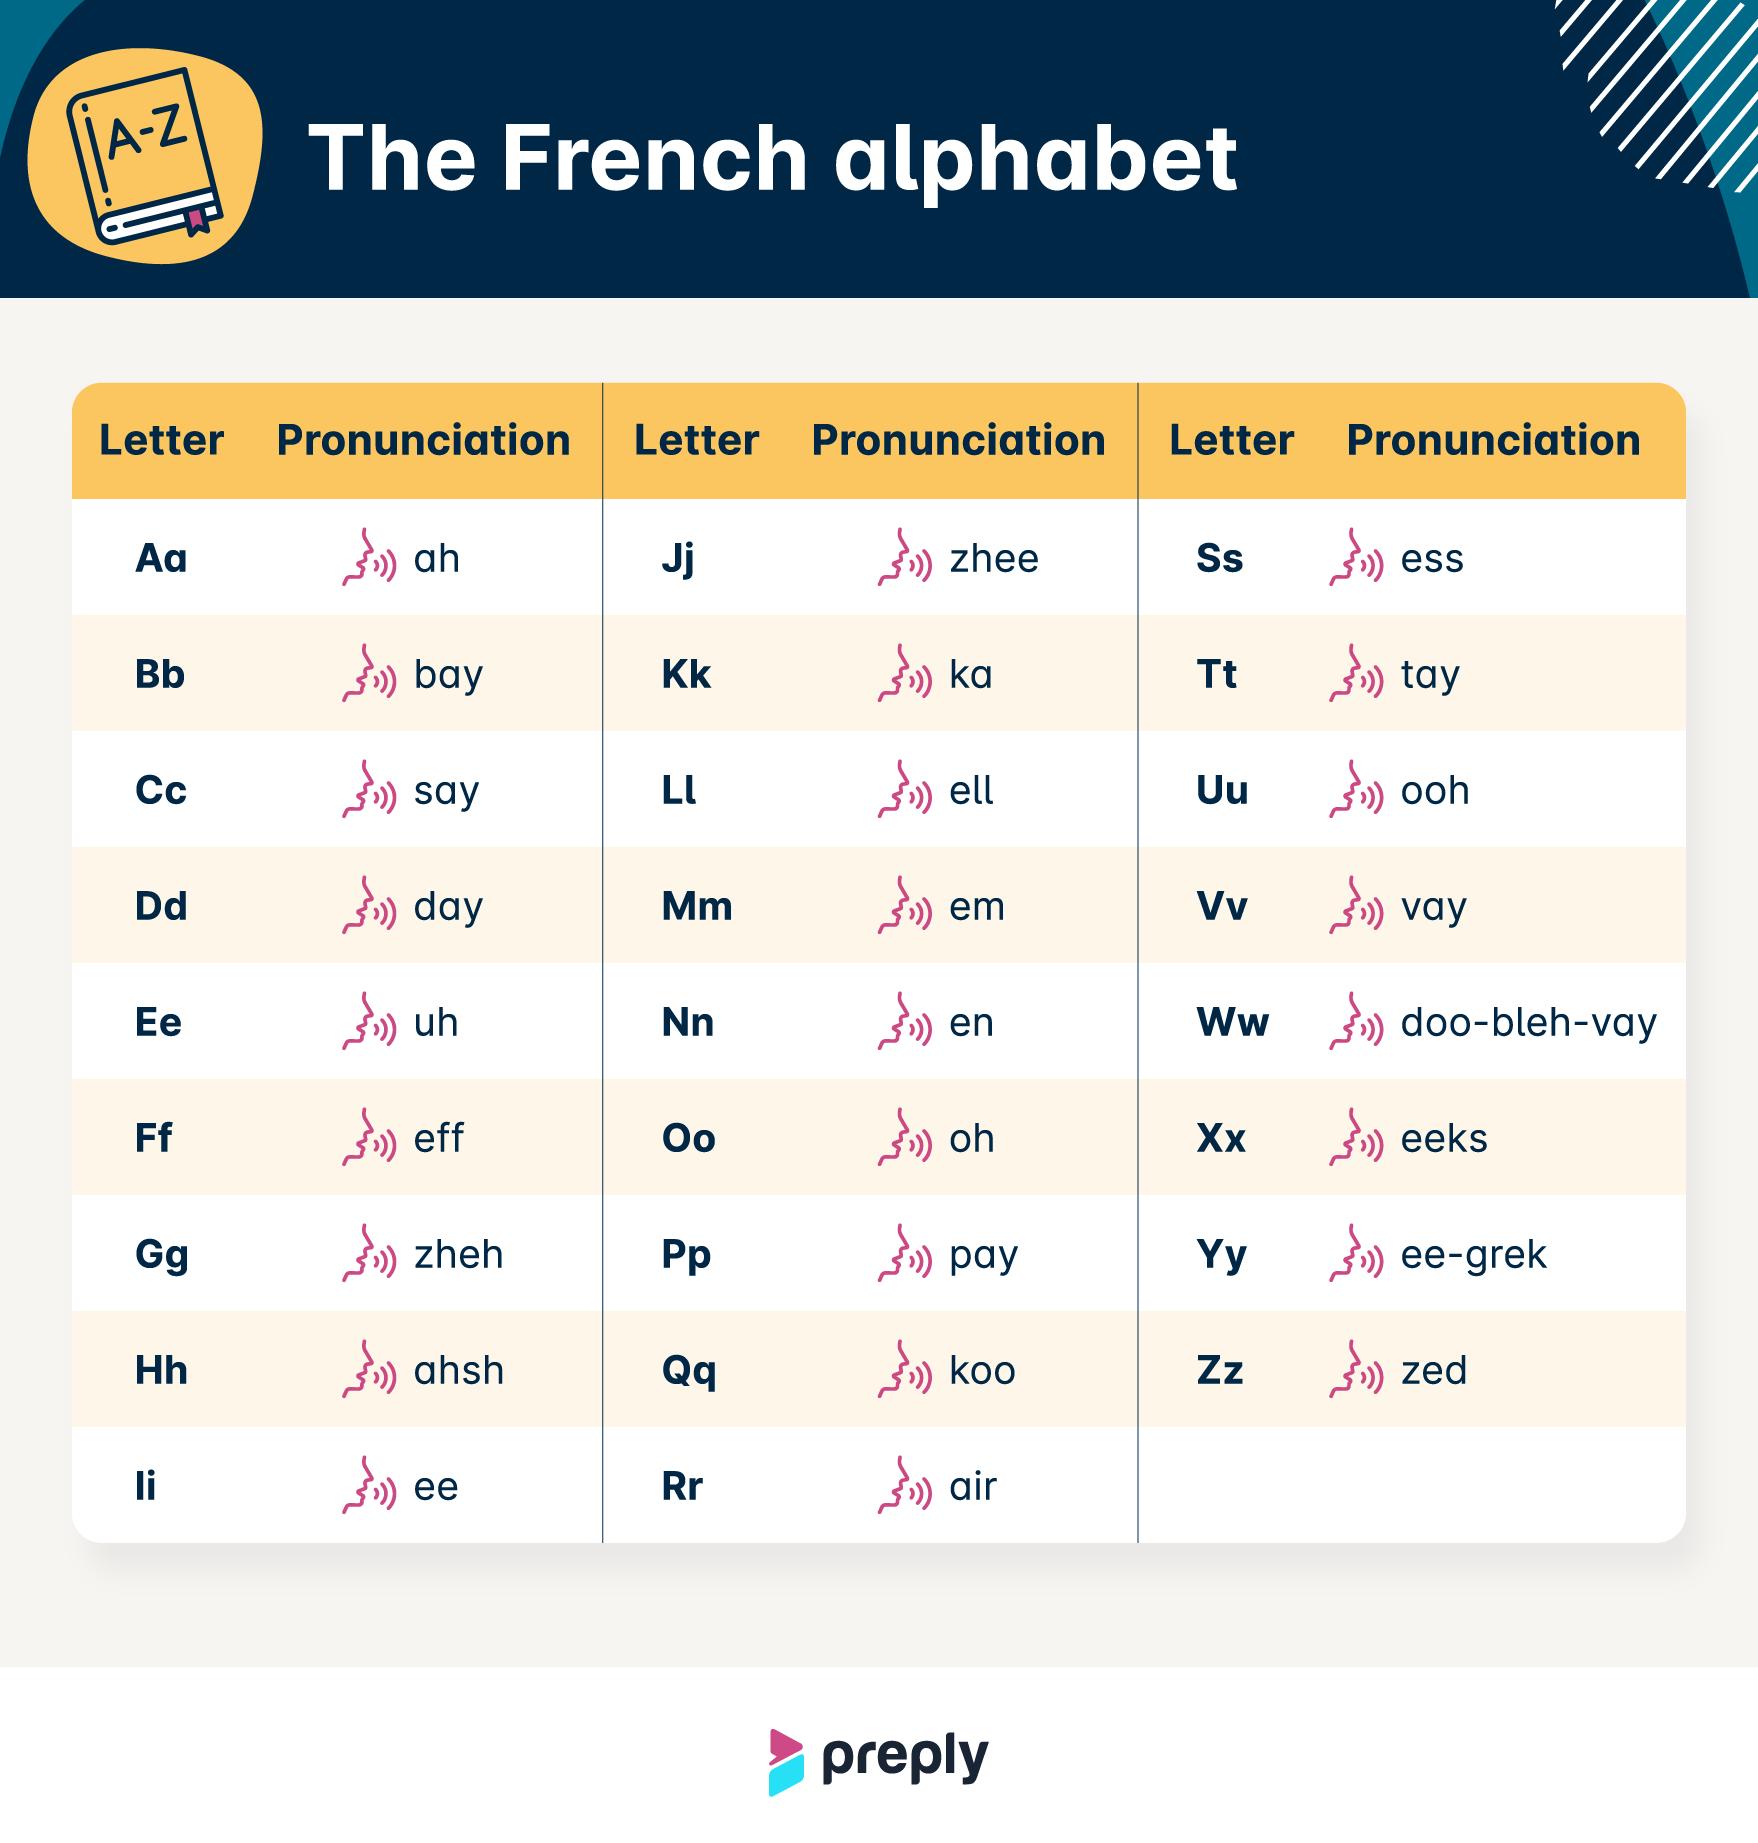
French Alphabet Pronunciation | How to Pronounce Letters in French
